How to Install Belgard Castlemanor Grana Pavers in Carlsbad: Complete Guide
Transform your Carlsbad outdoor space with the timeless elegance of Belgard Castlemanor Grana pavers. This comprehensive guide walks you through every step of planning, installing, and maintaining these distinctive tumbled pavers that bring Old-World charm to modern San Diego County homes. Whether you’re creating an intimate courtyard patio, expansive entertainment area, or elegant driveway, understanding the installation process ensures stunning, long-lasting results that enhance your property value and outdoor lifestyle.
Understanding Belgard Castlemanor Grana Pavers
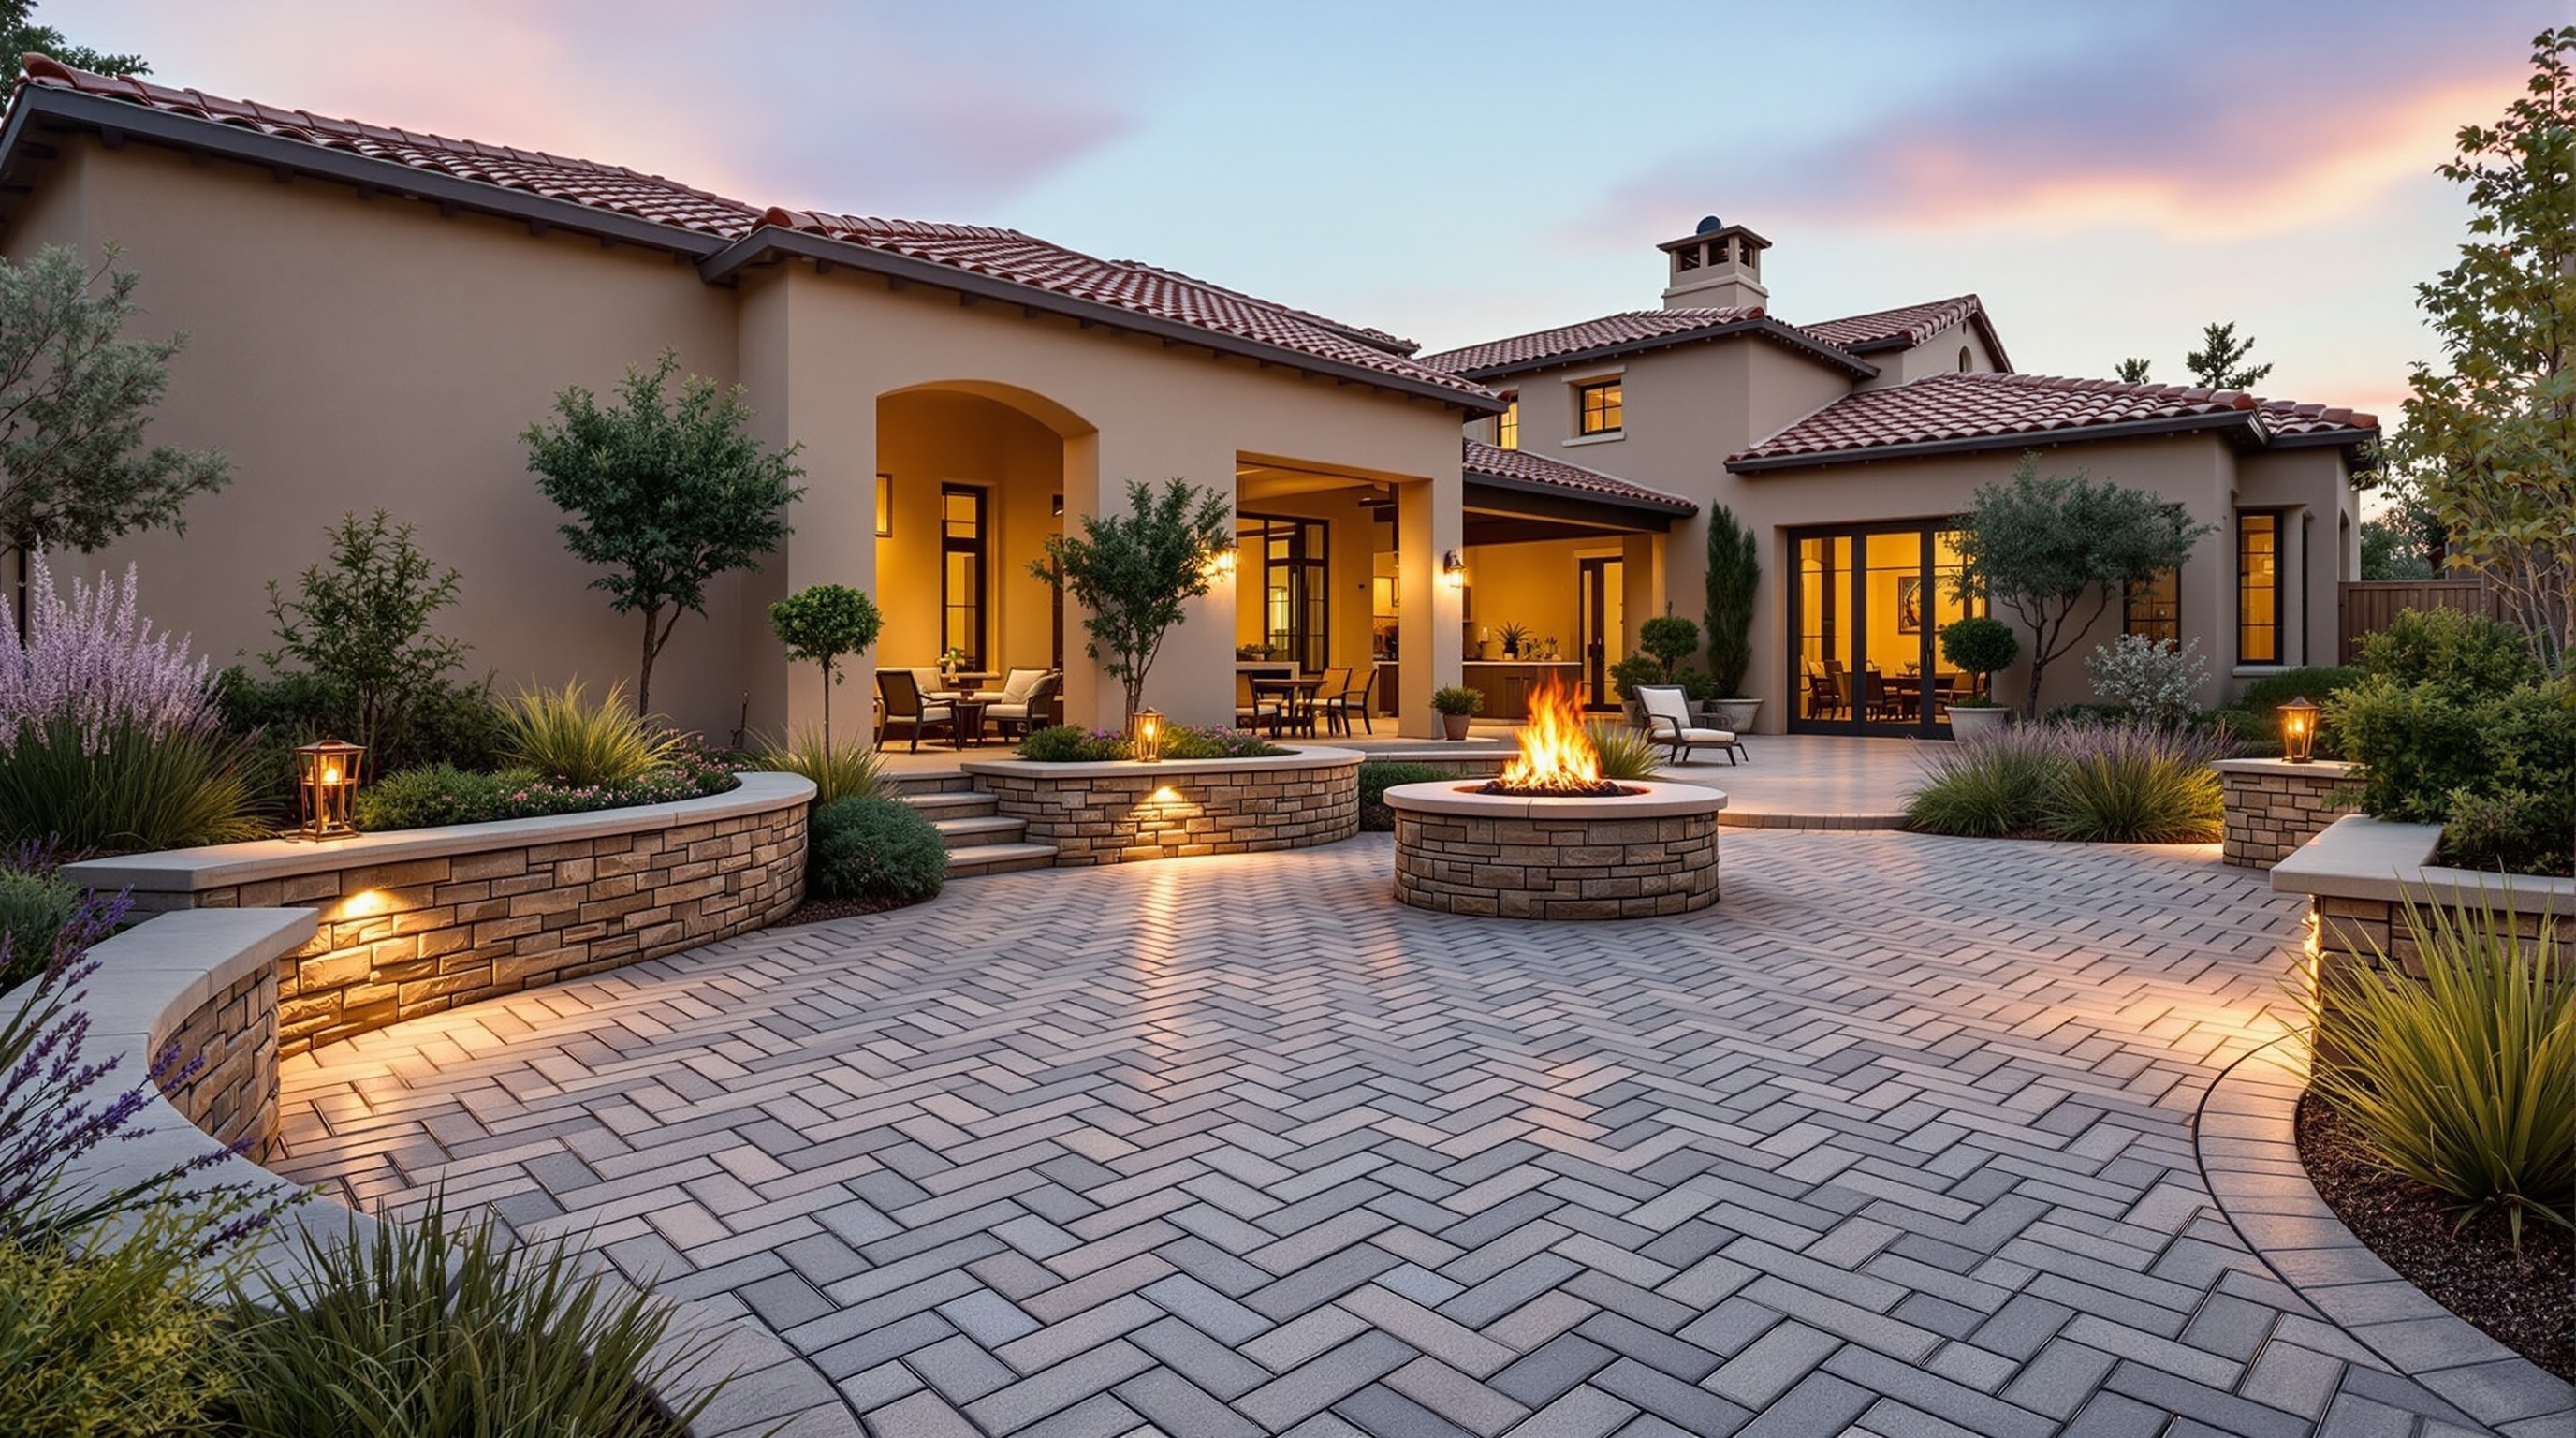
Belgard’s Castlemanor Grana represents the pinnacle of architectural paver design, combining sophisticated aesthetics with proven durability. These pavers feature a tumbled finish that creates an authentically weathered appearance, as if your patio has graced your property for generations. The grana color palette blends warm grays with subtle taupe undertones, creating dimensional beauty that shifts throughout the day as natural light plays across the textured surfaces.
The Castlemanor line utilizes multiple paver sizes within a single system, allowing for intricate pattern possibilities that elevate your design beyond standard grid layouts. This multi-format approach enables random ashlar patterns, herringbone layouts, and custom arrangements that showcase the tumbled edges and weathered character unique to this premium paver series.
For Carlsbad homeowners, particularly those with Mediterranean, Spanish Colonial, or Tuscan-style architecture, Castlemanor Grana creates seamless visual harmony between hardscape and home. The muted, sophisticated color palette complements stucco exteriors, terracotta roof tiles, and the drought-tolerant landscaping that defines Southern California outdoor design.
Planning Your Castlemanor Grana Installation
Successful paver installation begins with thorough planning weeks before the first shovel breaks ground. Start by clearly defining your project scope—will this be a simple patio replacement, or does your vision include integrated retaining walls, outdoor kitchens, fire features, or seating areas?
Site Assessment and Measurement
Walk your Carlsbad property and identify the installation area. Document existing drainage patterns, slope considerations, and underground utilities. San Diego County requires utility locating before excavation, so contact DigAlert at 811 at least two business days before your planned start date. Measure the space multiple times, adding 10% to your square footage calculation to account for cutting waste and pattern complexity.
Consider sun exposure throughout the day. Carlsbad’s coastal location provides moderate temperatures, but western exposures can become warm during summer afternoons. Note existing trees, structures, and features that cast shadows or might interfere with your design. These observations inform furniture placement, shade structure needs, and how your finished space will function throughout the year.
Design Development
Castlemanor Grana’s multi-size format offers exceptional design flexibility. Popular patterns include:
Random Ashlar: Creates an organic, European courtyard aesthetic by mixing paver sizes in an irregular pattern without repeating sequences. This approach maximizes the tumbled finish’s visual impact.
Herringbone: Arranges pavers at 45 or 90-degree angles, creating classic elegance while providing superior interlock strength for driveways and high-traffic areas.
Running Bond: Offsets pavers in straight rows, offering a clean, contemporary interpretation that still honors the Old-World character of the tumbled finish.
Sketch your design on graph paper, establishing focal points like fire pits, seating walls, or outdoor kitchen locations. Hardscape Flow regularly assists Carlsbad clients in translating Pinterest inspiration into buildable reality, ensuring your vision aligns with proper installation requirements and site-specific considerations.
Material Calculations and Ordering
Calculate your paver quantity based on square footage plus your 10% waste factor. Castlemanor Grana ships in pallets containing specific ratios of each paver size—ordering from a single production run ensures consistent color throughout your project. Color variation between manufacturing batches is normal with quality pavers, so under-ordering and reordering later risks visible differences.
Beyond pavers, your material list includes:
- Class II road base aggregate (4-6 inches depth)
- Bedding sand (1 inch depth)
- Polymeric jointing sand
- Edge restraints (aluminum or plastic)
- Landscape fabric (optional but recommended)
- Concrete for edge restraint anchoring
Step-by-Step Installation Process
Professional paver installation follows proven methodology refined over thousands of projects. While ambitious DIYers can tackle smaller projects, understanding the process helps you appreciate the craftsmanship involved and make informed decisions about professional installation.
Step 1: Excavation and Grading
Mark your patio perimeter with marking paint or stakes and string. Excavate to a depth that accommodates your base layers plus the paver thickness (typically 2.375 inches for Castlemanor Grana), while achieving proper finished height relative to adjacent structures. In Carlsbad and throughout San Diego County, finished pavers should sit slightly above surrounding soil to prevent water and dirt migration onto your patio.
Create a minimum 2% slope away from structures for drainage. This equates to a 1/4-inch drop per linear foot—subtle enough to feel level underfoot while preventing water accumulation. San Diego’s clay soils compact well but benefit from mechanical compaction to prevent future settling.
Remove all organic material, roots, and debris from the excavation. Any soft spots indicate inadequate soil that requires additional removal and replacement with compactable aggregate.
Step 2: Base Preparation
The foundation determines your patio’s longevity. Pour Class II road base aggregate in 2-3 inch lifts, compacting each layer with a plate compactor until achieving 95% compaction density. This multi-lift approach ensures thorough compaction throughout the base depth—dumping 6 inches at once and compacting the surface leaves loose material beneath that eventually settles and creates paver movement.
Maintain your 2% slope throughout the base, checking grade frequently with a 4-foot level. Proper base preparation prevents the most common paver installation failures: settling, shifting, and uneven surfaces that develop over time.
The compacted base should feel rock-solid underfoot. If you can easily push a screwdriver into the surface, additional compaction is necessary.
Step 3: Edge Restraints
Install aluminum or commercial-grade plastic edge restraints around the patio perimeter before placing bedding sand. These restraints prevent horizontal paver creep that develops as pavers shift under foot traffic and thermal expansion. Secure restraints with 10-inch spikes driven through the restraint base into compacted aggregate below, spacing spikes every 12-18 inches.
For curves and radius installations, choose flexible edge restraint products designed for curves rather than forcing straight materials into curved applications. The tumbled edges of Castlemanor Grana work beautifully in curved designs, softening geometric rigidity while maintaining Old-World character.
Step 4: Bedding Sand Layer
Spread coarse bedding sand (concrete sand, not masonry sand) approximately 1 inch deep over the compacted base. Never compact bedding sand—this layer remains loose to allow pavers to settle into a level plane during compaction.
Screed the sand level using straight pipes or metal conduit as guides. Lay two pipes parallel across your patio space, fill sand between them, and drag a straight 2x4 across the pipes to create a perfectly level sand surface. Remove the pipes and fill the voids carefully, avoiding disturbing the screeded surface.
Walk on the base aggregate, not the screeded sand. Place boards on the sand to kneel on during paver installation, distributing your weight without creating impressions in the sand bed.
Step 5: Paver Installation
Begin paver installation from a straight edge, typically the house foundation or established reference line. Castlemanor Grana’s random ashlar pattern requires attention to the designed pattern sequence—lay out several square feet dry before committing to ensure pleasing visual rhythm and proper size distribution.
Place each paver directly downward onto the sand bed without sliding, which disturbs the screeded surface. Maintain consistent joint spacing of approximately 1/8 inch between pavers. The tumbled edges create naturally varied spacing that enhances the weathered aesthetic while maintaining structural interlock.
As you progress across the patio, step back periodically to verify pattern consistency and ensure straight lines where intended. String lines help maintain alignment for borders and major pattern lines. Work from multiple pallet bundles simultaneously, mixing pavers from different bundle locations to blend any subtle color variations throughout the project rather than creating distinct zones.
This installation visual process reveals the artistry involved in premium paver work—experienced installers develop an eye for color balance and pattern flow that transforms technical installation into outdoor art.
Step 6: Cutting and Edge Details
Perimeter pavers typically require cutting to fit. Mark cut lines carefully and use a diamond-blade wet saw for clean, precise cuts that maintain the professional appearance your project deserves. The tumbled edges of Castlemanor Grana are forgiving—cut edges blend naturally within the overall aesthetic without appearing obviously freshly cut.
For Carlsbad installations incorporating curves, soldier courses, or intricate patterns, cutting becomes both more frequent and more critical to the design’s success. Take time with these details—rushed cutting shows in the finished product.
Step 7: Compaction
Once all pavers are placed, compact the entire surface with a plate compactor fitted with a protective pad to prevent scuffing the tumbled finish. Make 2-3 passes in different directions, settling pavers into the sand bed and creating a uniformly level surface. This compaction locks pavers together in their final position, establishing the structural interlock that gives paver patios their legendary durability.
You’ll notice slight elevation differences become uniform during compaction. Any pavers that settle excessively indicate insufficient bedding sand—remove these pavers, add sand, and reset before final compaction.
Step 8: Joint Sand Application
Sweep polymeric sand across the paver surface, working it into joints from multiple directions. Polymeric sand contains binding agents that activate with water, hardening to resist erosion, ant colonization, and weed growth while remaining flexible enough to accommodate minor paver movement.
Remove all excess sand from paver surfaces before activation. Mist the entire surface with water according to polymeric sand manufacturer specifications—typically a fine mist that penetrates joints without flooding or creating runoff. Allow 24 hours before exposing the surface to foot traffic and several days before furniture placement.
Complementary Hardscape Elements
Castlemanor Grana pavers serve as the foundation for comprehensive outdoor living spaces that extend your Carlsbad home’s livable square footage. Hardscape Flow specializes in integrated designs that combine multiple elements into cohesive, functional outdoor environments.
Retaining Walls and Seating
Belgard’s coordinating wall systems complement Castlemanor Grana beautifully. Consider low seating walls around your patio perimeter, creating defined space while providing flexible seating for gatherings. Taller retaining walls address slope challenges while creating terraced outdoor rooms that maximize usable space on hillside properties common in Encinitas, La Jolla, and throughout coastal San Diego County.
Fire Features
Built-in fire pits anchored within your paver patio create natural gathering spaces for cool Carlsbad evenings. Using the same grana color palette for fire pit surrounds unifies the design while the tumbled texture adds dimensional interest to vertical surfaces.
Outdoor Kitchens
Extend your culinary space outdoors with custom kitchens that include built-in grills, refrigeration, storage, and prep surfaces. The durable, non-combustible nature of pavers makes them ideal for kitchen flooring, withstanding dropped utensils, spills, and the foot traffic that accompanies outdoor entertaining.
Lighting Integration
Low-voltage LED lighting transforms your Castlemanor Grana patio from daytime beauty into nighttime ambiance. Hardscape Flow incorporates lighting plans during installation, running conduit beneath pavers before compaction to avoid future disruption. Path lighting, wall lights, and feature illumination extend your outdoor season while enhancing security and property value.
San Diego County Climate Considerations
Carlsbad’s Mediterranean climate offers year-round outdoor living opportunities while presenting specific installation considerations. San Diego County’s minimal freeze-thaw cycles eliminate the cracking and heaving challenges that plague paver installations in colder regions, but our unique conditions require attention to different factors.
Drainage and Water Management
While San Diego receives limited rainfall, winter storms can be intense. Proper slope and drainage prevent water accumulation that damages surrounding structures. Consider permeable paver installation techniques that allow water infiltration between joints, supporting groundwater recharge while managing stormwater runoff—increasingly important as water regulations tighten throughout California.
UV Exposure and Color Retention
Intense Southern California sun gradually fades lower-quality pavers. Belgard’s manufacturing process and quality materials ensure Castlemanor Grana maintains color vibrancy for decades. Sealers provide additional UV protection while enhancing color depth and simplifying maintenance.
Drought-Tolerant Integration
Frame your Castlemanor Grana installation with California native plants, succulents, and drought-tolerant species that thrive in San Diego County. Decomposed granite pathways, dry creek beds, and strategic hardscaping reduce water-dependent turf while creating beautiful, sustainable outdoor spaces that align with state water conservation goals.
Maintenance and Long-Term Care
Castlemanor Grana’s tumbled finish naturally disguises minor wear, but proactive maintenance preserves beauty and extends lifespan for generations. San Diego County’s mild climate simplifies maintenance compared to harsh-weather regions.
Regular Cleaning
Sweep your patio weekly to remove debris, leaves, and dirt before they stain or deteriorate polymeric sand. Rinse with a garden hose as needed—Castlemanor Grana’s textured surface doesn’t show water spots like smooth pavers. For stubborn stains, use appropriate paver cleaners following manufacturer recommendations.
Pressure washing is acceptable but requires caution—excessive pressure
Frequently Asked Questions
What makes Belgard Castlemanor Grana different from other pavers?
Castlemanor Grana features a distinctive tumbled finish that creates an authentically weathered appearance. The grana color blend combines warm grays and taupes, offering dimensional beauty that complements Mediterranean and Spanish-style homes common throughout Carlsbad and San Diego County.
How long does Castlemanor Grana paver installation take?
A typical patio installation ranges from 5-10 days depending on project size and complexity. This includes excavation, base preparation, paver installation, edge restraints, and joint sand application. Complex designs with curves or integrated features require additional time.
What is the best pattern for Castlemanor Grana pavers?
Random herringbone and ashlar patterns showcase Castlemanor Grana's tumbled texture beautifully. These patterns create visual interest while providing excellent interlock strength. The multi-size format allows for creative designs that enhance the Old-World aesthetic.
How do I maintain Belgard Castlemanor Grana pavers?
Sweep regularly and rinse with water as needed. Apply polymeric sand stabilizer to joints and reseal every 2-3 years to maintain color vibrancy and protect against stains. The tumbled finish naturally hides minor wear, making maintenance straightforward for Carlsbad homeowners.
Can Castlemanor Grana pavers handle San Diego's climate?
Absolutely. These pavers are engineered for California's dry climate with excellent UV resistance and minimal water absorption. They withstand temperature fluctuations, won't crack like concrete, and their permeable installation options support drought-conscious landscaping requirements.
Ready to Get Started?
Contact Hardscape Flow for a free estimate on your project. We serve all of San Diego County.